JANE IS BASICALLY A GAME MADE OF PHOTOS


When I started taking pictures for the game, I did not realize it would be a challenge and a whole puzzle! I started without any plan, no guidelines really. The “outside scenes” photos were the first to be taken. Everything was fine. I was having fun trying different angles. I was trying to imagine where things would be and how the player would navigated between the scenes.
Then came the moment where I had to import the photos into the editor. I realized I missed a lot of photos. It was a mess! I had to find an effective way to represent the “player navigation” on a sheet of paper. If, for example, the player is in a scene where he can walk up or retrace his steps, I must have a photo for the scene in which he is, but also a photo from the other angle (180-degree). Still can’t believe I didn’t think about that. Yet, it's the basis of first person point-and-click games. Anyways, I made a clear plan with the photos I had. I also noted those that were missing and that I needed to take. I was very pleased with this simple method that allowed me to work effectively.
Once I finished with the “outside scenes” photos, I had to do the interior of the apartment. I used the same method and it went well. Later, I still realized i was missing some photos. I forgot to take pictures of a closed AND open door. I only had pictures of the open door. A few weeks later, I took the missing photos and I was finally done with the photos!
I was done, but not really. Until now, I only have photos. Nothing else. The next step was to integrate them in the editor and to program the navigation between all these scenes (every photo is a scene, basically). It was not a very tough job. It was rather long and not very exciting. Instead of just doing the navigation, i decided to keep myself busy by also changing the cursor icon in every scene. The cursor changes if the player hover the mouse on different interactions in a scene. The cursor icon will change if the player can move forward, turn around, go right or left.
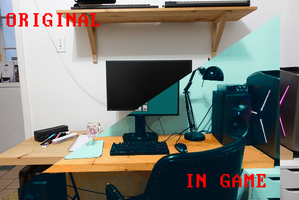
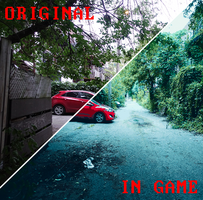
The next thing to do was to turn these super big HD photos into images that were similar to the games made in the 90's. I started by resizing the photos into the format i needed. It's a format that I determined for different reasons that I will not share because it’s not relevant. I then pixelated all the photos using a software, I imported these photos to Photoshop to add a color filter. Like in a movie, I had to make sure of the fluidity between the scenes and their level of colors by adjusting the contrast, vibrance, etc ... I liked this process because I could already feel the atmosphere and spookiness of the game. It was motivating (and still is)!
In the next Devlog, I'll talk about the first puzzle I programmed!
---------------------
Quand j’ai commencé à prendre les photos pour le jeu, je ne réalisais pas à quel point ce serait un challenge et tout un casse-tête! J’ai commencé sans plan, sans directives vraiment. Les photos à l’extérieures ont été les premières à être prises. Tout allait bien. Je m’amusais avec des angles différents, j’imaginais ou les choses seraient placées et comment le joueur naviguait entre les scènes.
Quand j’ai commencé à importer les photos dans l’éditeur, j’ai réalisé qu’il me manquait beaucoup de photos, des prises côté sud, puis une côté nord. C’était le bordel! Je devais me trouver une façon efficace pour recréer un trajet qui fait du sens. Par exemple, si le joueur se trouve dans une scène et qu’il peut avancer, ou se retourner pour revenir sur ses pas, je dois avoir une photo pour la scène dans laquelle il se trouve, mais aussi une photo 180 degrés. Chose à laquelle je n’ai pas immédiatement pensé. Pourtant, c’est quand même la base des jeux Point-and-Click en première personne. J’ai donc fait un plan clair avec les photos que j’avais. J’ai également noté ceux dont j’avais besoin et à partir de ce moment, tout allait mieux. J’avais une méthode simple qui me permettait de travailler efficacement.
Une fois terminé avec les photos extérieures, j’ai attaqué l’intérieur de l’appartement. J’ai utilisé la même méthode et ça s’est bien passé. Plus tard, j’ai quand même réalisé qu’il me manquait quelque photos. J’avais oublié de prendre les photos d’une porte fermée et ouverte. J’avais seulement les photos de la porte ouverte. Quelques semaines plus tard, j’ai repris cette série de photos et je finalise enfin la prise de photos!
Mais ce n’est pas tout! Jusqu’à maintenant, j’ai seulement des photos. Rien d’autres. La prochaine étape était de les intégrer à l’éditeur et de programmer la navigation entre toutes ces scènes. Ce n’était pas un travail très difficile. C’était plutôt long et pas très excitant. Je me suis occupé du changement de curseur en même temps. Le curseur change si le joueur le place sur différentes interactions dans une scène. Dans ce cas si, la direction du curseur change si le joueur peut avancer, se retourner, aller à droite ou à gauche.
La prochaine étape était de transformer ces grandes photos HD en images qui se rapproche des jeux similaires des années 90. J’ai commencé par recadrer toutes les photos dans le format du jeu. C’est un format que j’ai déterminé pour différentes raisons que je ne nommerai pas, parce que ce n’est pas très pertinent. J’ai ensuite pixelisé toutes les photos à l’aide d’un logiciel, puis ensuite j’ai passé ces photos dans Photoshop afin de leur ajouter un filtre de couleur. Comme dans les films, je devais m’assurer d’une fluidité entre les scènes au niveau des couleurs. Ajuster le contraste, la vibrance, etc… J’ai bien aimé ce processus, parce que je voyais déjà un beau résultat et je pouvais m’imaginer à quoi le jeu allait ressembler. C’était motivant.
Dans le prochain Devlog, je vais parler du premier puzzle que j’ai programmé!
JANE - anyone can be scared
A friend needs your help, what happened to her?
| Status | Released |
| Author | Never Grown Up Games |
| Genre | Adventure |
| Tags | Atmospheric, Dark, First-Person, Ghosts, Horror, Mystery, Point & Click, Singleplayer |
| Languages | English |
More posts
- JANE IS FINALLY AVAILABLE!Sep 26, 2021
- JANE IS STILL IN DEVELOPMENTJan 27, 2021
- I AM MAKING A 90'S INSPIRED POINT-AND-CLICK ADVENTURE GAME!Nov 07, 2019

Leave a comment
Log in with itch.io to leave a comment.